mbacollegespune.in


Tuesday, 7 May 2013

BB-BOX update V1.35 Ready [06-05-2013]


Hi to all,
This is the latest Update for 3GKey / BB-Box customers :

Official website link : 3GKey / BB-Box Update v135 [06-05-2013]
Direct download : http://www.3g-key.com/downloads/3GKe...Setup_v135.zip


3G-Key Suite Update v1.3.5
3G-Key SAT Update v1.4.6


ZTE phones ( Android platform )


Code: GigaByte G3105
Orange Boston
TMN Smart A15
ZTE Aqua
ZTE Blade 2
ZTE Blade 3
ZTE Boston
ZTE Ice
ZTE Maxi Plus5
ZTE Racer 3
ZTE Roamer 2
ZTE T22
ZTE V790
ZTE V8043
[+] Added DIRECT UNLOCK


Other improvements added

[+] Added new versions of Huawei U7xxx U8xxx U9xxx series (before not supported)
[+] Added manual comport selection (now 2 ways, auto and manual)


[+] Fixed bug in 3GKey SAT with certificate generation
[+] Other minor problems detected and fixed


Thanks in advance for your attention.
With best regards,

MTK Android (Sp flash tool ) tutorial


What's needed:


  • USB data cable

  • MediaTek USB VCOM drivers

  • SP Flash Tool ( Latest version SP_Flash_Tool_v3.1224.01)


  • First of all, make sure that you have MediaTek DA USB VCOM drivers installed.


Flashing the whole ROM


  • First of all open SP Flash Tool, then click Scatter-loading button to load the correct scatter file

    (MT6575_Android_scatter_emmc.txt or MT6577_Android_scatter_emmc.txt, depending on which phone you have) for your device and ignore any message that may appear.


  • Turn off your phone, remove the battery and replace it after some seconds (and don't turn on the phone).

  • Press F9 (or hit Download button) and connect your phone into the computer via USB data cable.

    The process will start and a red progress bar will appear.


  • After the red progress bar is complete, there will appear a purple progress bar.


  • Right after the purple progress bar is complete, a message will appear underneath it:

    Please insert USB cable in x seconds” and then the download will start right away (you will see the yellow progress bar filling up).


  • When the yellow bar is complete, you'll get a popup with a green circle and Download OK message,

    which means that the process has been successfully terminated.


  • You can now safely disconnect your phone and turn it on. The process ends here.


Flashing only part of the ROM


  • In case you want to flash just one part of the ROM, that is also possible. In the shown example, only recovery image will be flashed.

    Deselect all parts except the one(s) you want to flash and then press F9 (or hit Download button).


  • The tool will immediately show a warning because not all parts are selected, but you should continue anyway. Safely press Yes to continue.


  • The download of the chosen partition image will start and
    after the yellow bar is complete, the popup with the green circle
    should appear.


  • Please note that, even though it isn't mandatory to select it on the list of images to flash,

    preloader file must be present in the same folder as the other
    partition(s) that you want to flash, or else phone will not be able to
    enter into download mode.


Attention: Please follow the instructions carefully. I will not take any responsibility on whatever may happen with your phone.


Very important warning: Always make sure that you trust the sources of the ROM you download and know that it is meant for your phone.

After flashing a wrong preloader, your phone will be completely
dead (can't be powered on, it will not charge and won't be detected
anymore by the computer) and there is no way to recover it.


Walton Primo UPGRADE করে নিন GB 2.3.6 থেকে ICS 4.0.4(অফিসিয়াল)এ।

অনেকে বলেছেন এটি নাকি কপি পেস্ট টিউন modarator ভাইরা কই গেলেন ?  আবার অনেকে
বলেছেন আজাইরা কামের দরকার কি ছিলো কাপি পেষ্ট মেরে। যারা আগের পোস্ট দেখে
 Walton Primo ব্রিক করে ফেলেছেন শুধু তারা দেখুন এবং
apply করুন ১০০ % কাজ হবেই। কাজ হলে কমেন্ট করে বুঝিয়ে দিন । আমি টিউন কখনো
করিনি তাই কাউকে দেখে তো শিখতে হবে। তাই অন্যান্য টিউন এর মত হয়ে যেতে
পারে। যদি এটা কপি পেষ্ট ইয় তাহলে সবার কাছে ক্ষমা চেয়ে নিচ্ছি।
modarator ভাই যদি কারো কাজে না লাগে পোস্ট টি ডিলিট করে দিবেন। 


  লিঙ্ক গুলো আমি আ্পডেট করে দিয়েছি। ডাউনলোড করার নিয়ম নিচে দেখানো হয়েছে।


 ITS ORIGINAL ICS 4.0.4 For WALTON PRIMO. Tested by me.


আমি
কোন প্রফেশনাল টিউনার নই। আমি শুধু মাঝে মাঝে টি.টি.তে ঢু মারতাম । কিন্তু
যখন কোনো টিউন দেখে আর ৫ জন এর মত আমার Walton Primo টা ব্রিক করে ফেললাম,
আবার কমেন্ট করে  ভুল Solution পেলাম তখন কার ভাল লাগে? নিশ্চই আমার মত
আপনাদের ও ভাল লাগে নি। কে চাইবে সাধের  Walton Primo ব্রিক করে walton
service center এ দিয়ে ১৫ দিন বিরহে পুড়তে। কিন্তু কি আর করা, আমি তো সেই
ভুল করে ফেলেছি । তাই সাধের ফোন টি walton service center এ দিয়ে এলাম ।
বাসায় এসে নেট ঘেটে অফিসিয়াল আইসিএস এর ওরিজিনাল লিঙ্ক পেয়ে গেলাম তাই
টিউন না করে পারলাম না। কারন হাজার হোক আমরা তো ভাই ভাই (By primo)।


যাই হোক অনেক কাহিনি  বললাম। এবার মূল কথাই ফিরে আসি। এই পোস্ট টি যারা অনেক দিন Gingerbred 2.3.6 ব্যাবহার
করে ক্লান্ত বা অফিসিয়াল আইসিএস(ICS 4.0.4) আপগ্রেড করতে গিয়ে ধরা
খেয়েছেন ( ব্রিক করেছেন) তাদের জন্য  । এর ফাইল গুলো আমি নিজে আমার বন্ধুর
প্রিমো তে ফ্লাশ করে দেখেছি  কোনো বাগ (Bug) নাই। ১০০ % OK।


ডাউনলোড লিঙ্ক


  • BP Flash Tool                                                                                        BP Flash Tool (আপডেট লিংক)

  • AP Flash Tool                                                                                       AP Flash Tool  (আপডেট লিংক)

  • ICS BP                                                                                                      ICS BP  (আপডেট লিংক)

  • ICS AP                                                                                                     ICS AP  (আপডেট লিংক)

  • BP V3025                                                                                               BP V3025  (আপডেট লিংক)

  • Driver যারা আগে ইন্সটল করেছেন তাদের আর করা লাগবে না।                        Driver (আপডেট লিংক) 


 ড্রাইভার ইন্সটল পদ্ধতি


  • প্রথমে Driver.rar ফাইল টি আপনার সুবিধামত extract করে নিন।

  • mobile টি usb দিয়ে কানেক্ট করুন।

  • তারপর  my computer > right click> manage>Device manager>যে ডিভাইস গুলো হলুদ
    মার্ক করা সেটাতে right click> install/update driver>Browse my
    Computer for Driver Software> Browse করে আপনার পিসির যেখানে Driver টা
    extract  করে রেখেছেন সেটা চিনিয়ে দিয়ে next করুন>continue
    anyway>finish।


                              আইসিএস(Icecream Sandwich 4.0.4) আপগ্রেড পদ্ধতি


  • প্রথমে BP ডাউনলোড পরে AP  ডাউনলোড দিতে হবে।

  • যারা GB 2.3.6 এ রয়েছেন তারা সুধু 1st Primo ICS BP ICS  ডাউনলোড দিলেই হবে।

  • যারা
     এর আগে BP  ডাউনলোড দিয়ে ICS 4.0.4 কাস্টম রম use করছেন তারা প্রথমে
    591316_8376_WCDMA_V3025 ডাউনলোড দিবেন তারপর  1st Primo ICS BP ICS 
    ডাউনলোড দিবেন।


BP (base band) Download


  • Flash BP.zip ফাইলটি extract করুন। FastbootV1.0.2.4(BP+AP)... নামের একটি ফোল্ডার পাবেন।

  • ভলিউম (-) বাটন এবং পাওয়ার বাটন একসাথে চেপে ধরুন। Install QPSC Download এর মত লেখা আসলে বাটন ছেরে দিন।

  • ডাটা ক্যাবল দিয়ে মোবাইল পিসির সাথে কানেক্ট করুন।

  • my computer > right click> manage>Device manager>ports(com&lpt) এ গিয়ে com port no. টি দেখে নিন।

  • FastbootV1.0.2.4(BP+AP)... নামের ফোল্ডার থেকে FastbootV1.0.2.4 সফটওয়্যারটি Openকরুন।

  •  BP port এ পোর্ট নং টি বসান। 1st Primo ICS BP.rar  extract করে Browse এ গিয়ে 1st Primo ICS BP ফোল্ডার টি দেখিয়ে দিন।

  • Download এ ক্লিক দিন। না বুঝলে নিচের ছবি টা ভালো করে দেখুন। হয়ে গেলে  ব্যাটারী খুলে আবার লাগান ।


 AP (Firmware)  Download


  • Flash AP.zip ফাইলটি extract করুন।EMMC_AP for flash rom নামের একটি ফোল্ডার পাবেন।

  • মোবাইলের পাওয়ার বাটন  এবং ভলিউম(+)বাটন একসাথে চেপে ধরুন।সবুজ পর্দা আসলে বাটন ছেরে দিন।

  • ডাটা ক্যাবল দিয়ে মোবাইল পিসির সাথে কানেক্ট করুন।

  • EMMC_AP for flash rom ফোল্ডার ওপেন করুন।এখান থেকে QUALFAST2.0.3(Factory) সফটওয়্যারটা Open করুন।

  • SEL Path থেকে ব্রাউস করে 2nd Primo ICS AP ফোল্ডারটি দেখিয়ে দিন।তারপর ওকে বাটন চাপুন।

  • না বুঝলে  নিচের ছবি ফলো করুন।ডাউনলোড সাকসেস্ফুল দেখাবে।নিচের ছবির মত।


 হয়ে
গেলে battery খুলে-লাগিয়ে অন করুন । ২ থেকে ৩ মিনিত পর আপনি ICS 4.0.4 এর
সাদ পাবেন।এ্টি আমার প্রথম পোষ্ট , ভুল হলে দয়া করে মাফ করবেন। Problem হলে
বা ভাল লাগলে  Comment করবেন।


CWM for Walton Primo & Symphony w25


Hellow Friends....


After a long work i finally managed to compile and port cwm to walton primo which will also worked on w25

This is a lottery for the bangladeshi user with walton primo because
with CWM inside you can do anything with your android (Rooting,
Backup,Untoot,Partition,ect...)


And there is also a small file which will help you to root and unroot your primo and w25....


All files are in the attachment below.....


Guide For Inatalling CWM and Root (Simple)


1. Download the required files to flush and extract it

2. Put your phone in fastboot mode (Hold Power bottom and vol + until the green screen)

3. Click "Click to Flash Recovery.bat" to install CWM and wail until rebooting..

4. Done...
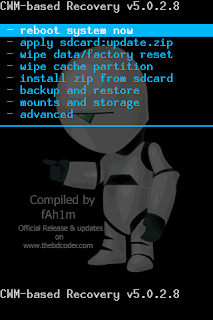


How to Root


1. Put the files "Root.zip" in sd card

2. Flush through CWM (Select install from SD card in CWM)


Attached Files


File Type: rar Root&Unroot.rar -
[Click for QR Code]
(824.2 KB, 7364 views)
File Type: zip Recovery.zip -
[Click for QR Code]
(4.89 MB, 5549 vi


Walton Primo G1 Update (MT6577) Jelly Bean v4.1


I am posting now the guide and official Release of Jelly Bean 4.1 for
Walton Primo G1 a MT6577 DEvice .. it has been officially released in waltonforum few days ago ...


Specification :


Quote:


You can google it and if yours android is similar to this
specification ( a lot of them are because they are duplicate of another
chines android ) then you can use it too in your android Mt6577 ..


Before flashing this new update First backup your previous vertion
of android ... in case something goes wrong ... For that I am giving
you the Official Factory Rom and also another way to backup your current
os using CWM ..


Installing CWM


1. Download CWM compiled by me ... ( BEta release still has some bugs .. if you have better then pm me ..)

2. Flash Using Mobile Uncle Tools provided below .. (need root)

or if you are not rooted then use sp flash tools and the scatter file from my thread ...

3. Turn off you phone and boot into CWM using Power+vol UP .

4. Select backup & restore and then backup ..


Both of them files and other extra modules and drivers regarding G1 will be found in my therad here


Quote:


if you have download mobile uncle tools from market then uninstall
it and use the one provided in the thread ... becz some people pm,ed me
they aren't able to flush it using latest so...


How to Update from ISC 4.0 to Jelly Bean 4.1


1. Download the Update from here

2. Install Necessary drivers


Quote:


If the Mt65xx preloader driver failed to install then go to device
manager and right click on that and select update driver and then browse
the location of the driver ..


3. Unzip it and Open Flash Tools and Load the scatter file ..


4. Turn off your android and in flash tools click Download


5. SP flash tools should connect with mtk vcom preloader and should
upgrage your android .. if every thing goes right then you will see the
green circle with OK ..


Quote:


If you see an yeollow mark on mt65xx preloader in your device
manager (it will only appear for few seconds so you have to be quick )
then follow step 2


Enjoy Official Stable Jelly Bean 4.1 in Your Android ..


Well if you dont have any backup or semi bricked your G1 (failed to boot , white screen on boot) then ...


Original Stock Factory Rom (ISC v4.0) For Primo G1 is provided below ....


Here.....


here are the recent screenshots of g1 jelly bean .....


Monday, 6 May 2013

Intex aqua swadesh mtk 6575 read flash and hard reset method


Intex aqua swadesh mtk 6575 read flash


HARD RESET

PRESS VOLDOWN+HOME+ POWER

SEE 8 OPTION

PRESS 5th option CLEAR FLASH


Sunday, 5 May 2013

Modified Usb Cable For All CPU


Modified USB Cable For All CPU


Hello,
I Modified USB Data Cable CA-101 & tested on All CPU. No need to
press boot key it will autodidact & do job very fast.


Copyright @ 2013-2015 Android Mobile Doctor.