mbacollegespune.in


Wednesday, 4 December 2013

How to Repair No product Name


!! MOST WANTED SOLUTION !!


Here is Video of Repairing Samsung Note 2 N7100 No product name. Method is almost same of all phones.


here we go


Samsung Note 2 N7100 No product name Video we create for let you
understand how you can do that. Product name mostly Disappear when you
do Boot repair with Boot Repair Card & Wrong Flash & Could be
hardware fault. if you got phone in Dead condition and you repair it's
boot ( for example we have N7100 ) after boot repair from Boot repair
card you will see there is no product name. or if some flash it wrong
and mobile goes to dead and after boot repair with boot repair card you
see there is no product name then you have to have GPGeMMC box to repair
it.


Here is picture with NO product Name:


1st of all you have to select model, after selecting model you have to
see pinouts, Double click on picture to zoom, Sold Wire according to the
picture ( you must sold 100% Correct wires and Sold wire with lot of
care ) after sold wires to the phone Sold that 6 wires to the small ISP
Small PCB according to the picture, after just connect small pcb to box.
Keep in mind you don't need to put any kind of power like Usb, Power
Supply, Battery etc... you don't need any kind of power just connect
small isp pcb directly to the box without giving power to phone. After
every thing is ready Untick BLANK check and Click on Erase lets software erase, After erase complete. Untick All files and select only BOOT1 and select "Samsung_N7100_GPG(The_number_of_mobile_phone ).boot1" after all Click on Write.
Make sure you select only BOOT1. you do not Flash any other file. After
write complete UnSold mobile Connect LCD etc. and Flash mobile with
normal ways... your phone will be back to normal. Keep in mind GPGeMMC
can't repair Hardwarely Damaged phones !!


Here is picture after done


Br


Faisal_Computer

Samsung I9070 Galaxy S Advance Successfully Boot Repair Done By Syed Mobile Zone


Samsung I9070 Galaxy S Advance


Successfully Boot Repair Done

By

Syed Mobile Zone

Special Thanks To

MalikUnlocking


For Guide


˙·٠•●♥
I'm Not "HANDSOME"
But I Can Give My "HAND" To "SOME" One Who Needs Help.

Beauty Is In Heart,Not In Face...!˙


Download Samsung Galaxy Tab 3 10.1 GT-P5220 User Guide Manual Free


Download Samsung Galaxy Tab 3 10.1 GT-P5220 User Guide Manual Free


Slim and sleek design


The new GALAXY Tab 3 (10.1″) offers a sleek design with a lighter and
slimmer form while still providing a gloriously large 10.1″ screen.
You’ll have a comfortable grip while still enjoying the majestic view.

Download Samsung Galaxy Tab 3 10.1 GT-P5220 User Guide Manual Free

Vivid and wide 10.1″ WXGA display


10.1″ WXGA resolution (1280 x 800, 149PPI) guarantees a crisp and clear, incredibly sharp delivery of all your,Casio G’zOne Commando 4G LTE User Guide Manual Free
hi-resolution photos and videos.


Flat on your palm, but big on sound


If music is your passion, built in Sound Alive audio enhancer will
truly be a music to your ear. Enjoy deeper drum and extended tinge when
listening to your favourit music. Moreover, you’ll get an immersing
audio experience from all your videos with Dolby Surround.


Samsung Galaxy Tab 3 10.1 GT-P5220 user manual,Samsung Galaxy Tab 3
10.1 GT-P5220 user guide manual,Samsung Galaxy Tab 3 10.1 GT-P5220 user
manual pdf‎,Samsung Galaxy Tab 3 10.1 GT-P5220 user manual guide,Samsung
Galaxy Tab 3 10.1 GT-P5220 owners manuals online,Samsung Galaxy Tab 3
10.1 GT-P5220 user guides,


Tuesday, 3 December 2013

How To Install Custom Roms in HTC Android Phones


How To Install Custom Roms in HTC Android Phones ( Beginners Guide )


Hi
Friends & Gsm Cocktail Users Today i will post some info about how
to install Custom Roms ( Ice Cream Sandwich , Jelly Bean 4.1 Etc) Using
Gsm Cocktail HTC Android Tool.


What You Will Need ?


  • Boot-loader Unlocked

  • Recovery Image File

  • Custom Rom File In Zip Format ( Any Rom Version Of Your Choice !)


Step I

Get
Read Info Of Your Phone & Check Phone Boot-Loader Is Locked Or
Unlocked If Boot Loader Is Locked You Need To Unlock It First, Check
Tutorial Below!


Step II


After
Unlocking BootLoader Now 2nd Step Is Installing Custom Recovery Image
File ( Cmw Recovery ) Installing Recovery is Simple Just Download Proper
Image From GsmCocktail Support Area Or From GsmCocktail Shell


Check Tutorial Below!


Step III


Now
Third Step Is So Simple After Installing Recovery CMW Check Phone is
Going To Recovery Mode Or Not ? Checking Method ( Press Volume Down +
Power Button Then Click On Recovery Mode And Wait 2 Minutes If It Goes
To Recovery Menu It Is Recovery Mode Now You Can Install Any Custom Rom!


Firmware DROID RAZR M Verizon Jelly Bean 4.1.2 by Firmware Team


Download Rom From GsmCocktail Support Copy It To Phopne Memory Or Memory
Card Insert Card In Mobile Then Go To Recovery Mode & Now Do These
Steps Down Below!


  • Wipe everything (Format all Partitions )

  • Select Zip and install

  • Reboot enjoy!


For Any Further Help Post Question Here

Always Make Post With Details of Your Problem & Screen Shot Or Info Of GsmCocktail, We Can Help Only That Way!


Firmware DROID RAZR M Verizon Jelly Bean 4.1.2 by Firmware Team


"FIRMWARE TEAM"


Presents:


Original Jelly Bean Fastboot Files for DROID RAZR M Verizon


Android 4.1.2 ---- 98.15.66.XT907.Verizon.en.US


VZW_XT907_4.1.2-9.8.1Q-66_1FF.xml.zip


DOWNLOAD


Firmware DROID BIONIC XT875 Verizon USA Jelly Bean 4.1.2


Android 4.1.2 ----


VZW_XT907_9.8.1Q-66-1_1FF.xml.zip


DOWNLOAD


How To ROOT Your Android Device Without Bricking It


Requirements


* USB cable compatible with your device


* PC


* Your Device ( Of Course)


* Rooting Software


Download Root With Restore Bin4ry

Root_with_Restore_by_Bin4ry_v21 by gaba mobile

Set up your Device for Rooting

Ok now that you've downloaded Root With Restore Bin4ry, let's set up
the device for Rooting, but before that, install the drivers that
shipped with your device on to your Computer. Done ? Well then let's
start


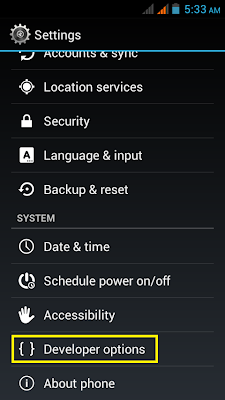
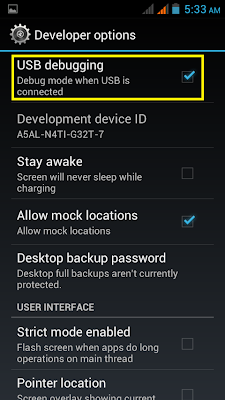
Step 1 - Go to SETTINGS ,click on DEVELOPER OPTIONS and enable USB DEBUGGING as shown in the image below


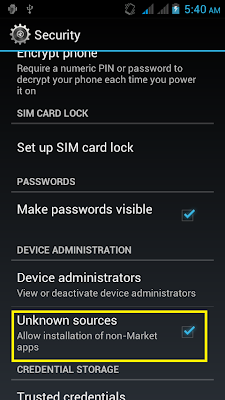
Step 2 - Go to SECURITY under SETTINGS and enable UNKNOWN SOURCES


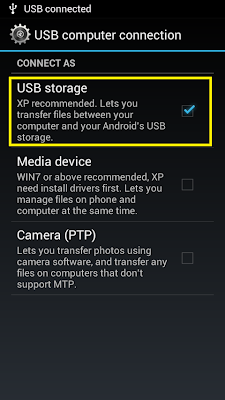
Step
3 - Plug in your phone to the PC via a USB. Now slide down the
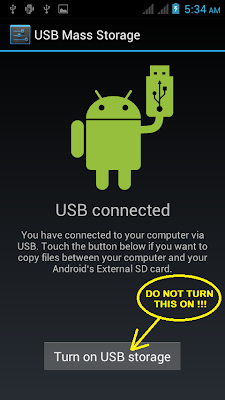
Notification and connect your device as USB STORAGE , but make sure
that USB STORAGE is TURNED OFF !!!


Let's start now

Now that we're ready, let's get started .


* Unzip Root with Restore Bin4ry


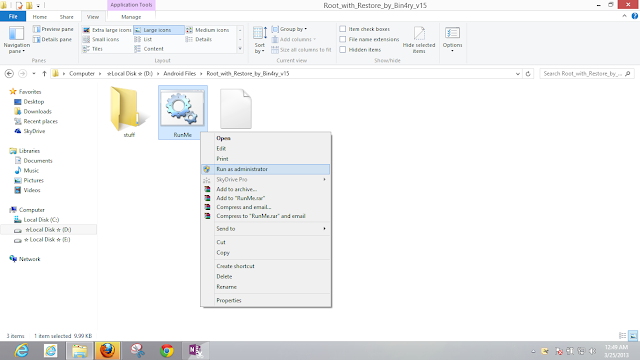
* Open the folder and right click on RunMe.bat and select Run as Administrator


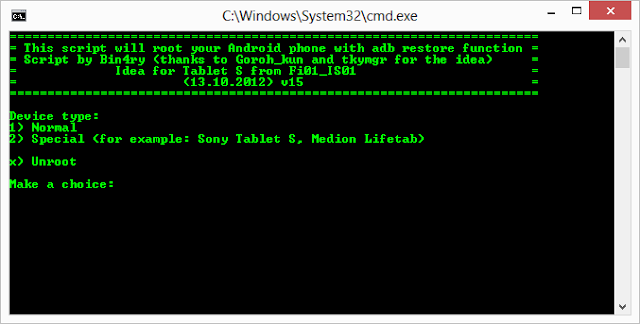
* Now on the Terminal Window that appears, choose the relevant option ( Choose 1 if you're not using a Sony Device)


*
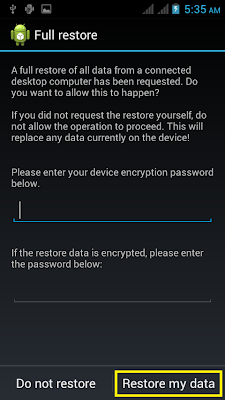
In a few seconds you'll get the following message on your Device's
Screen , simply click on Restore My Data and you're done...


* Your device will reboot twice and you'll have it Rooted
HOW TO CHECK IF YOUR DEVICE IS SUCCESSFULLY ROOTED OR NOT

It's quite simple. Just browse your App Drawer and you should see the
SuperSU App installed. Now you're all set to tweak with your device


Stay tuned for more Tutorials on Android


World first mtk6582 imei repair done by volcano 2.4.2


ONLY ON DONE BY VOLCANO BOX


-5 inch multi-touch screen

- MTK MT6582 Quad-Core ARMv7 Processor, 1.3GHz

- GPU: PowerVR SGX 544MP

- Android 4.2 os Jelly Bean

- Dual SIM card dual standby, WCDMA/GSM+GMS network

- Support 3G WCDMA (HSDPA) network

- 8.0MP back, 2.0MP front camera, with LED flashlight


Uploaded with ImageShack.us


many many thx to gaba brother imei in 6582 cpu repair done by from umesh gaba je help


Copyright @ 2013-2015 Android Mobile Doctor.